Showing posts with label Tutorial. Show all posts

Monday, September 14, 2015

Add Home Button to Blog Header and Customize Blog Labels

To increase SEO (Search Engine Optimization) score for your blog, it is a very wise idea to use label for all your blog post. Default label given by simple template in Blogger.com is too simple and not so much attractive. I start using label after realizing a lot of blog tycoon are using labels in their blog. In this post, I will share on how to:
  1. Create label on post
  2. Display labels in your blog header area
  3. Use CSS to customize labels look
  4. Add a home button inline with labels (by default no home button provided except for the post footer)

1. Create label on post

After completing your new post, under the Publish button there is an area for Labels, Schedule, Permalink, Location, Search Description and Options. Click on Labels area and  fill in your post label. Then click on Done

post labelling

2. Display labels on your blog header area

Go back to your blog dashboard then click on Layout. Click on add-gadget in cross column section and choose Labels
add new label

add label

customize blogger label

In title box, fill in your label list title, modify all the other options as you wish. In Display area, choose either List or Cloud. Untick Show number of posts per label to hide post count for every label. Those numbers are usually hard to customize but it's up to you.

label jenis cloud
Label Display Cloud

label jenis list
Label Display List

Your blog labels look different than the picture above?Don't worry, read on

3. Use CSS to customize labels look

This part includes blog template HTML code editing. Backup your template before modifying any HTML code

From your blogger dashboard , click on Template-Customize-Advanced-Add CSS

customize label blogger


Insert codes below in the Add CSS section. You can modify Font style, Font Color, mouse hover color and other styles. Click Apply to Blog to save this changes


.label-size{
margin:0 2px 6px 0;
padding: 3px;
text-transform: uppercase;
border: solid 1px #C6C6C6;
border-radius: 3px;
float:left;
text-decoration:none;
font-size:10px;
color:#666;
}
.cloud-label-widget-content{
text-align:center
}
.label-size {
background:#ffffff;
display:block;
float:left;
margin:0 3px 3px 0;
color:#ffffff;
font-size:11px;
text-transform:uppercase;
}
.label-size a,.label-size span{
display:inline-block;
color:#2E2E2E !important;
padding:6px 8px;
font-weight:bold;
}
.label-size:hover {
background:#E2E2E2;
}
.label-count {
white-space:nowrap;
padding-right:3px;
margin-left:-3px;
background:#ffffff;
color:#fff !important;
}
.label-size {
line-height:1.2
}


4. Add a home button inline with labels (by default no home button provided except for the post footer)

Your Labels now show all labels tagged in your blog posts but there is no Home button to return to your blog homepage. To insert this Home button, also needs you to modify your blog template HTML codes. Backup your template before making any changes for your own safety.

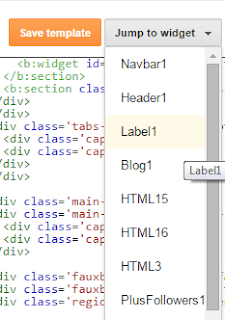
From your blogger dashboard, click on template-Edit HTML then click on Jump to Widget and choose label1 or any names given in add gadget step. Then expand the codes for label1 and codes for main by clicking on small arrow beside the line number of those 2 codes.

customize label blogger
expand widget

tambah link ke home blogger

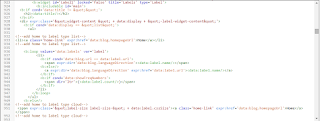
Insert the codes below right after first <ul>  label1 scope. These codes are for list display type labels.

<!--add home to label type list-->
<li><a class='home-link' expr:href='data:blog.homepageUrl'>Home</a></li>
<!--add home to label type list-->

Insert the codes below right after first <b:else/> after last </ul>. These codes are for cloud display type labels.

<!--add home to label type cloud-->
 <span expr:class='&quot;label-size label-size-&quot; + data:label.cssSize'><a class='home-link' expr:href='data:blog.homepageUrl'>Home</a></span>
<!--add home to label type cloud-->

Click on Save Template button to you save your blog's modified HTML codes and cick on View Blog to view the results
Customize blog label dengan design sendiri dan tambah Link ke Home di bahagian atas Blog


Good Luck

Read This Got This : $25K for solving a riddle
Read This Got This : 4 ways to eat keropok lekor
Read This Got This : Google analytics for blogger
Continue Reading →

Monday, September 7, 2015

Preventing unauthorized access to WIFI network


WiFi has become a standard network for every household in the world. Almost every house in the world that subscribed to Internet uses WiFi for networking system. Do you know WIFI network could easily breaked over by intruders? Do you know counter measures on preventing unauthorized access to WIFI network? There are 3 common types of WiFi in the world:

1. Open WiFi
2. WEP protected WiFi
3. WPA/WPA2 protected

Open WiFi commonly used in public WiFi hotspot and hotel along with a user control gateway portal. Everyone can connect to the network but only users with valid username and password could access the Internet. There is also some users that use open WiFi for their private network risking unauthorized access to the network

WEP protected network is the oldest and weaker type of protection. Attacker could use tools such as Xiaopan or Kali Linux and perform ARP poisioning attack to gain access to the network. 

WPA/WPA2 so far is the strongest type of protection against penetration attack. It is possible to hack WPA but will take much longer time assisted with a set of guessed password list. There is a tool named reaver to shorten the time needed to hack WPA password. Some older devices doesn't support WPA type network. If this is the case, use other means of protection such as MAC fitering.

How to prevent unauthorized access

1. Disable WPS Pin Code.
WPS is WiFi protected Setup designed to ease the process on registering new devices to a wireless network. There are 2 types of WPS, Pin Code and Push Button. Push button is more secure to attack
because it needs physical access to the router push button compared to PIN code which  is very unsecured. Xiaopan and Kali LINUX users can take less than 5 minutes to crack the PIN code using Reaver


2. Use WPA/WPA2
WPA/WPA2 is more advanced and more secure than WEP authentication. Refer to your modem's manual on how to change the encryption type. Cracked WEP key could also be used to crack encrypted data travelling through your network risking leak of sensitive information. Use WPA/WPA2 instead of WEP

3. MAC filtering
This is for me the safest method to protect your network against unauthorized access unless the intruders have physical access to your devices and spoof their MAC with your MAC address. Using this method, only allowed MAC address given access to the network. Xiaopan or Kali Linux would never get any chance to crack your network.

4. Use wireless access gateway
This system is used for Internet access in hotels and paid hotspot scattered around the globe. Username and passwords are created in random and could only be used once. Hotel's or restaurant owner should use this system to protect their network.

Some people take a light attention to network security. They think of "Nothing loss, only some speed reduced". However there are so many possibilities that could be done by the intruders once they got access to your network listed but not limited to below:

1. Read your ISP's username and password.
Routers' configuration embedded web server usually doesn't use HTTPS. The password field is masked but could be easily unmasked using inspect element function. They could use your login info on their DSL line.

2. Change your router configuration admin username and password
Many users use default supplied router admin username and password which is attainable with a click on google. They could login to you router and change the username and password preventing you to change the WIFI password


3. Read sensitive data.
Cracked wireless key means your encrypted data could also be decrypted using the same key. Your phone number, sosial number, corporate email or your banking details could be read by the intruders.

Remember, our network is our network. Protected network means protected data and sensitive information. If your network suddenly becomes slower and your routers LEDs are blinking heavily, out of usual. Check your wireless network client. Your network could be attacked by someone. Take action and use counter measures to prevent unauthorized access to your precious WIFI network.


Continue Reading →

Thursday, August 13, 2015

Win 7 hidden tricks and features

Windows 7 has almost come to obsolete with the appearance of  Windows 8 and Windows 10. However most of us are still using Windows 7 due to its simplicity and user friendly features. I have discovered some Win7 hidden tricks and features. They surely will rock your day and makes you nerdier than your friend

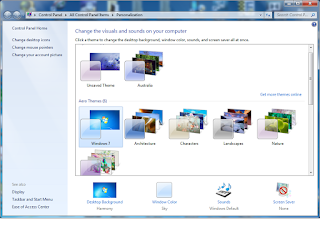
Hidden international wallpaper

This is the very basic of win 7 hidden tricks and features. You will be amazed to know that Win 7 localization is not limited to GMT and language only

1. Click on the windows button (formerly start button) then type in the search box 
C:\Windows\Globalization\MCT" then press enter

2. A list of subfolder for MCT folder will be opened. Choose your desired theme and open the them subfolder of the MCT subfolder 

3. Double click the theme you see in there. A shortcut to the theme is now installed in the personalization setting.
win 7 hidden theme

Right click on desktop, choose personalize and choose background or theme.

Shake it , loose it

Sometimes it is very tired when I pressed the keyboard but the words is not there because of accidentally pressing the touchpad and activating the other programs window. Now there is an easy and fun way to hide all the other windows except the one you are using.

Click and hole the title bar and shake the window. Yea, I'm not kidding. Shake the window. All other windows will be minimized. 

Sleep it , don't shutdown

The default button in the shutdown menu is to shutdown the system. There are a group of people that only sleep their system , this is including me. it is rather annoying to always click the arrow beside the shutdown button to select sleep option. Win 7 hidden tricks and features also include this trick.

Win 7 hidden tricks and features
Right click on the start button, choose properties then, on the start menu tab, select sleep from the drop down list at power button action. Click apply and OK

Command Prompt at your command

This win 7 hidden tricks and features is for command prompt lover. Sometime we need to use the command prompt especially when dealing with terminal or android SDK. You don't need to CD to any folder with this win 7 hidden tricks and features. Just Open any folder you want to work in(or Cd) the hold shift key and right click, select open command window here. The command prompt will open with the directory set to the folder.

Lazy fat mouse, use keyboard instead

You can use the keyboard to launch any taskbar pinned program. Press the windows key + number corresponds to the significant position of the program in the taskbar. Number 1 for left most, then number 2 and then number 3

I like to see them all

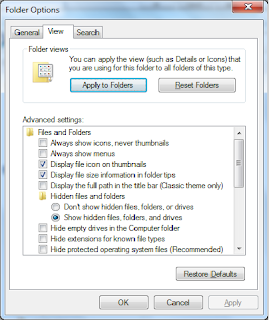
Win 7 hidden tricks and featuresDrive like memory card reader always get hidden if it is empty. I bet there are some people getting concerned on this behavior. They do afraid the card reader is broken. Now , we can force win 7 to show all drives even they are empty

From windows explorer folder, any folder click Alt key to show the top menu. Click on tools, folder option , go to View tab.

Uncheck the hide empty drives in the Computer folder.

Now all drives will be shown in the Computer folder


There are so many other Win 7 hidden tricks and features. I will keep them posted here. That's it for now.

Do you know you can use Win 7 system to act as a hotspot and could be connected by Android phone? See it here


Continue Reading →

Wednesday, August 12, 2015

How to install Xiaopan into USB Disk

Xiaopan OS is a Tiny Core Linux (TCL) based operating system that can be use to test your network security leaks and weakness. It can be installed as a standalone OS, in USB disk as a live disk or VM. I will cover a tutorial on how to install Xiaopan into USB disk and use it as a live disk. Read More >>>
Continue Reading →

Tuesday, February 24, 2015

Share 4g dongle broadband connection with android device

Why you want to share 4g dongle broadband connection with android device. Android device can be set to be a wifi hotspot but if we setup adhoc network connection using windows device (laptop, desktop) android device could not find the network because of the limitation in the android OS itself.

After googling and yahooing, i found a way to enable adhoc network sharing with android device and also with other device meaning that we can share any 4G dongle that is not designed to become a wifi hotspot such as .. you name it yourself. hehe.. This method is tested in WIN 7. other windows user, use on your own risk. This method is using wpa hosted network using Command prompt but i had simplified the process using batch file. Read More >>>
Continue Reading →

Wednesday, April 23, 2014

Paypal as a payment platform

I believe many of us had heard or read about paypal but not so many of us really know paypal or trust paypal. I have been using paypal as a payment platform for buying/selling on the internet especially for international market since 2010.

Paypal is a payment platform owned by ebay.com. We could see its' strength and how it will not cheat us by any means. Paypal.com also had established links to many of local banks in Malaysia and of course with big credit card brand especially visa and mastercard. Guess what, if we take a look at our atm/debit card we could see the visa/mastercard logo printed on them meaning we could use them to link with paypal.

How to setup paypal as a payment platform? You can see the examples in my product pages at 


or


or


or


As you could see at the bottom of each page, there are 'buy now' button along with visa/mastercard/other cards logo. If you click on the button, it will go to paypal payment portal equipped with details of your item to be purchased, my paypal.com id and customers' paypal login credential and pay with credit card link.

If your customer already have paypal account, they could login to paypal and pay from their paypal account or paypal linked credit card. If they don't have paypal account, they could also pay using their credit card by clicking on the 'pay with my credit or debit card' link and entering their credit/debit card details. Paypal.com uses https means they are secure and had paypal.inc logo beside the address in the address bar means they have a valid security certificate. 

Now , how to put similar button in your blog? 

1. Log in/register with paypal.com by going to www.paypal.com and clicking on sign in for registered user or sign up to register new account. Choose premier account or you can upgrade later. No upgrade fee.

2. They will send verification e-mail, do that. bla bla

3. In your acount overview there are status: unverified under welcome XXXXXX. Now click on the unverified and verify yourself by uploading your scanned IC, license and latest bill.

4. When you have been verified you will see merchant service tab, click on it 

Paypal payment gateway

then click on website standard payment and Sell single item, create one now

Paypal payment gateway

Choose a button type, choose buynow, in the item name put in your item name e.g antic car, in item id field put in your reference e.g taj 1111, in the item price field put in your item price e.g 15000.00 then in the currency field choose your currency e.g MYR for malaysian ringgit (RM). 

Paypal payment gateway
Now go to step 3:Customize advanced features(optional) and select yes or no in 'do you want to let your customer change order quantities'. select yes if you wish to let your customer change order quantity and no if you only wish to sell 1 unit per each customer or if you are selling virtual product.

In ' can your customer add special instructions in a message to you?' select yes if you wish to and enter your message box name e.g Special instruction to seller.

In ' Do you need your customer shipping address' select yes if your product is deliverable and no if your product is virtual.

In 'take customers to this URL when they cancel their checkout' tick the box if you have any page to forward your customer if they think twice or accidentally cancel their checkout. E.g http://www.yourpage.com/really?.htm.

In 'take customers to this URL when they finish checkout' tick the box if you want to forward the customer to your thank you page or download page. E.g http://www.yourpage.com/thankyou.htm .

Paypal payment gateway

Next click on 'create button' button
Paypal payment gateway

You will be forwarded to generated code page..Click on select code then right click-copy or press ctrl+C key on your keyboard.
Paypal payment gateway

Then go to your blog design panel, go to posts, Select one post and click on edit below it

Paypal payment gateway


Click on html button and then position your cursor on the place where you want your button to be placed and paste the code by right click-paste or ctrl+v

Paypal payment gateway

Then update or publish your blog and advertise your blog using bidvertiser or adword and happy selling.

p/s : Do you know that we can use our google drive account to host our website? Check back later for google drive hosting...


Continue Reading →

Popular Posts

Recent Posts


air asia bloggers community

Unordered List

Text Widget

Pages

Total Pageviews

My Blog List